Wednesday, September 26, 2012

A room for Baby T

In honor of our baby's due date today, which it appears may pass by uneventfully, I thought it was a good time to share photos from the nursery. This has been a minor effort at our house compared with the big basement remodel we have underway (photos of that soon), but is important nonetheless, and I think turned out pretty cute in the end.


My goal has been to keep it from being too theme-y, so we did a little bit of Dr. Seuss, and a little of the first letter of his name, which will be "L." Other than that, I just tried to stick with primary colors and not go too crazy with any one thing. Here are the details:


Dr. Seuss prints using clip art I found on Google Images and tweaked in Microsoft Publisher. Frames from Target.


"L" Scrabble pillow cover from Nest Home Furnishings on Etsy. There are many options out there for these pillows but I'm glad I found this one - the fabric is kind of burlap-ish which I think is fun. The pouf ottoman was a lucky score from Target's Privet House collection. It's typically sold online-only but I stumbled upon this one in one of the stores - it was a return so 50% off! I wasn't sure if I was sold on it but knew I couldn't beat the price so put it in the space for awhile and it ended up growing on me.


Credit for the stuff in this photo goes to my friend Natalie Boike - I stole the bookshelves ideas from her baby's nursery. They're just IKEA shelves with a ton of books on them but I love how they fill the wall, and in keeping with my Dr. Seuss focus most of the ones on our shelves are by him, with others books tossed in and stored in the bins below. She also helped me figure out the hanging lampshade. Given our space is really limited in this room and there's only one outlet that can be turned on from the wall near the door, we needed to figure out a way to get a light in this corner and she suggested this idea. I ended up going with this yellow shade from Target, and needed to buy one of their cheap hanging paper lanterns to get the right size cord to fit inside the shade and be able to hang it. There are other kits out there to convert a lampshade to hang, including a $5 one from IKEA that I initially tried, but it was too big to fit the shade so I recommend going with something from the same store the lampshade is from - in this case, Target. The bins I'm using for toys and extra books are from Target too.


The "L"s and our changing table.


Couldn't resist doing another fabric-lined tray with Dr. Seuss fabric found on Amazon.com.

Here is where I found my L's:
1. I made this one based on something I saw on Etsy. The L is from Hobby Lobby online and I just cut the fabric to fit and Modge Podged over the top of it. The L was originally cardboard looking so I painted it blue before covering the front.
2. and 9. Found on Ebay, but I can't find the link to the specific vendor anymore.
3. From this Etsy shop
4. DIY Anthropologie letters from this post on 346living.com
5. Alphabet trays from West Elm 
6. From Urban Outfitters
7. From Touch of Europe
8. DIY of this option from Urban Outfitters. I used a smaller version of the cardboard letters used for the Anthropologie letters, painted the sides white, printed a map to fit the front, and modge podged over it all. The fun thing about doing this myself is I was able to customize the map, so it shows our hometown.
10. From Urban Outfitters

Saturday, June 16, 2012

New and improved entryway

We recently took a departure from our do-it-yourself mantra and paid to make some upgrades to our entryway, and I must say, it was worth it. In an ongoing effort to eliminate all the 70s-era decor from our house, we had the wrought-iron railings upgraded to the light wood that we had used in our bathroom remodel and that we'll soon be replacing all our existing woodwork and doors with. We found someone in Lakeville who specializes in railings and stairways and did a great job.

At the same time, we have been in need of extra shoe storage to keep all our shoes from piling up on the entryway floor, so I knew the existing setup needed to become more functional, especially given we'll be adding baby shoes to the mix in a few months.

Here's the "old" entryway, with stuff from the townhouse that we had just used to fill the space when we first moved in:


And here are some photos of the new and improved entryway:


My initial plan had been to build a custom storage bench to perfectly fit the space, but then I found this, which is just 2 inches from filling the space and I have to think costed less than building myself, and is likely better than anything I could have done on my own. I love it! I used my tried-and-true no-sew pillow cover technique to cover some old pillows, using outdoor fabric from Jo-Ann Fabrics. I'm hoping it will hold up better than some other fabrics would given this is such a high-traffic area. Believe it or not, another great thing about this bench is you can lift the lid to dig around inside without having to take the pillows on and off! If that weren't the case, there's no way these pillows would actually get any use.


A close-up of the detail on the railings - adore them!


Friday, April 20, 2012

Bathroom remodel done!

At long last, here are pictures of our completed bathroom remodel! It's actually been done for more than a month but there have been so many other things going on that posting the pictures has continued to fall off my to-do list. Between some work and personal travel, finding out we're having a baby, and just being busier than normal in general, it's been hard to sit down and post. In any case, here are the before and after photos - we're so happy with our new bathroom, and my wonderful husband worked so hard to make it happen, along with some great help from his Dad and our friend, Todd.

Let's start with the best part - the after's:


And, our old bathroom in all its retro glory - cracked sink, bad linoleum, and all:


Sunday, March 11, 2012

No longer MIA

I never thought this would happen to me, but it's been more than a month since my last blog post! We've had a ton going on, from crazy work schedules to a quick long weekend trip to Vegas, but the main thing taking up all of our spare time has been our bathroom remodel. What we thought would be a 2-weekend project is now going into its 5th week, but we are THIS CLOSE to being done. I've been saving back all the pictures for the big reveal post once we're ready for it, which should be in just a couple days.

Troy has been working tirelessly on this project, with some amazing and much appreciated help from friends and family. What's been keeping me busy, then? Trying to do everything else around here so he can stay focused on the bathroom! I can't believe how much laundry, cooking, grocery shopping, etc. we do for just the two of us! Cleaning has been another big thing the past few weeks - I can only stare at a layer of sheetrock dust on everything for so long before I start cleaning up a storm, only to have another layer take its place a couple days later. Needless to say, I haven't been getting any crafts accomplished lately, as all my house-related energy has been going to these "less fun" things. :(

Anyway, until we're ready to share our bathroom with the world, I wanted to follow up to one of my last posts about the client for whom I refinished a dresser. She had gorgeous maternity and nursery photos taken, and they were recently featured on a great Twin Cities-based blog called Somewhere Splendid. I'm so proud my dresser makes up just one little part of this beautiful and unique nursery, and to see it professionally photographed is a thrill, too. Enjoy poking around this blog, it's truly great!

Wednesday, February 8, 2012

My own clever idea

I am always in awe of the brilliant ideas I find out on Pinterest, and when I receive compliments on my work, I'm quick to point out I've simply followed someone else's instructions. That's why I'm excited that I've finally come up with my own clever idea - one I haven't seen anywhere else and that I think is easy enough and effective enough that others may really love it too: trays embellished with fabric and glass!


I got the idea after finding this tray at a thrift store on one of my routine furniture hunts - cute in its own way, but not my style and definitely not usable year-round:


So, I painted the tray red and, rather than paint the bottom as I've frequently seen, I decided to buy some coordinating fabric, cut it to fit the bottom, and get a piece of glass cut at Lowe's to sit on top to protect the fabric and recreate a hard surface. (Patterned paper would also work well in place of fabric.)

The red tray measures 14 x 14, and the fabric and glass were each cut to 13.25 x 13.25 and they fit perfectly (thanks to my dear husband for helping me get the measurements right!). The dark wood tray is from the always wonderful West Elm, and measures 12 x 12. Fabric and glass cut to 11.5 x 11.5 fit perfectly in this one.

This project is definitely affordable too - just 1/2 a yard of fabric is plenty, and I find plenty of great options in the clearance and sale racks so it usually costs very little. Each piece of glass ran around $5 at Lowe's. My thrift store tray was $4.99, and the West Elm one was $22 but worth it to me since I've wanted one for so long. Other cheap tray options are available at Jo-Ann Fabrics, which carries them in both the unfinished wood section and in the home decor section.

The sky is the limit on options for these trays, and I think they'd make a great gift too.
In the case of the red tray, it was a fun way to overhaul a thrift store find with potential, and for the dark tray, it was an easy way to customize a mass-produced item and make it coordinate with the other decorations that will go in our bathroom once remodeled.
Speaking of our bathroom, here's a sneak peak at what the wall art will be, also using the chevron fabric - demolition begins on Friday, so stay tuned for updates!


Tuesday, February 7, 2012

My first client!

I was thrilled with how quickly the first dresser I put out there sold. I even had a few interested people follow up afterward - one in particular wanted it for the nursery for her first child, who will arrive in a couple months. I offered to keep my eye out for another piece that I could redo for her, and as luck would have it, a few days later I found it at a thrift store near my house:


This one was another great find - it reminded me alot of the one I found and redid for myself, and my client really liked that one too so it was a great fit. Because I knew who the buyer would be, I was able to give her some choices on which of the paint swatch colors we'd use, as there were only four drawers instead of five. From there, I got to work redoing the dresser for her, as she wanted it this past Sunday. It was the quickest turnaround I've done yet, but it was actually fun having a client deadline to meet!

Here's how it turned out - aren't the drawer pulls great? Very retro but cool. Also, just for the record, I have plenty of other color schemes in mind, but the pink/red combo keeps selling so I keep making it! The two dressers I've sold now have each gone in a baby girl's or young girl's room. Now, I'm back on the prowl for the next great piece I can find, redo, and make available in the shop - the search begins again!


Quick weekend projects

I was busy most of this past weekend turning around a quick dresser refinish for my first client (more on that in the next post), but I did manage to get a couple quick craft projects done, too.

One was correcting a not-so-great choice a made awhile back, when I had really been bitten by the no-sew pillow cover bug (originally covered in this post). I had been looking for some fabric that included the color teal for our guestroom with teal walls, and found the below fabric. It did not strike me as looking camoflauge-esque at the store, but once I got it home, I couldn't stop noticing it. When a good friend came to my house for the first time and asked if the pillows were in honor of my husband's love of hunting, I knew once and for all that they had to go.


Herein lies the benefit of these no-sew pillow covers: switching them out is as simple as unlatching the safety pin on the back side, and recovering with new fabric. Luckily, in the case of the camo-like fabric, I was also only out $3 because it had been on clearance.

Here is the new fabric I found to continue tying in the teal. It was from the clearance section so not too pricey, and I think it gets me alot closer to where I had wanted to be initially. Truth be told, these West Elm pillows are completely perfect for the room with their teal and yellow, but I can't imagine spending that much. This $6 per pillow solution is much more my speed!


The other quick project I did this weekend was jazzing up a bulletin board to make it feel more appropriate to hang in our bedroom. My husband thinks bulletin boards are tacky (he wasn't swayed by this recovered version either, I won't lie) but I think they can serve their purpose. There are just some things I'd love to pin up and be able to look at rather than have shoved in a drawer somewhere.

I didn't take a before shot but it was a straightforward bulletin board, found for less than $2 at a thrift store where I typically buy furniture to refinish. After hot glueing some burlap-like fabric to the front and pinning the edges with decorative tacks (all materials from Jo-Ann Fabrics), it turned out like this:


And, despite my husband's disapproval, it is hanging on the wall in our room, with some photos, some Playbills, and my 10-mile race medal pinned up - all things I enjoy seeing every day that had been in my nightstand drawer for months, and in some cases, years.

Friday, January 27, 2012

Minor bathroom redo

It's been more than three months already since we moved into our house. We painted like crazy at the beginning and I've been crafting ever since, but now we'll be moving into some more substantial improvements. Our first one was this past weekend, when we swapped out the tiles on the side of our bathtub to make them more modern and to match the new wall color better. As with most projects, this was more involved than we first realized, but I like the updated version so much better. And, it gave us a pressure-free way to practice mudding and grouting some tile before we get into the much more involved project - completing remodeling our upstairs bathroom (more on that below). 

The before picture benefits from the realtor's wide-angle camera and better flash, but I assure you, even though it looks darker, the after is so much better!


As I mentioned, this little project is just the warm up for a big undertaking we'll be starting in February, which is to completely gut and redo our main bathroom. We're talking gut with a capital G - we're even redoing the sheet rock to get rid of the odd texturing thing you can likely detect below, taking down the one wall, adding pocket doors to free up wall space, etc. etc.

Again, this picture benefits from originally being taken by a realtor, but hopefully you can still capture all of its retro glory, though you can't see the cracks in the sink, etc. I cannot wait for our new bathroom! Check out my Pinterest board dedicated to the bathroom redecoration to get a sense of what I'm going to try to do in there - mustard yellow and gray all the way! :)

Sunday, January 22, 2012

Another dresser re-do!

After learning a lot from my first furniture refinishing project, I've been on the lookout for another piece I could bring back to life in much the same way, but this time list in my window shop. Much like house hunting was this fall, learning to see the potential in something that is less than beautiful at the moment is an acquired skill, and it's something I'm still working on. But, a few weeks ago I found the right dresser on which to replicate my paint swatch technique:


I used the same process as with the last dresser...


... and feel like I got another good outcome! This one is available in my window shop for anyone based in the Twin Cities who is interested - I can only have so many of these in the one room of my house where they fit the color scheme! :)


Sunday, January 15, 2012

On the chevron bandwagon

I love all the chevron stuff out there right now. I'm planning on incorporating it into our bathroom after our remodel, but for now I'm paying tribute via this string/nail art rendition.


To do this project I simply found various chevron patterns available via Google Images, and sized and cropped them to fit my wood pieces, and to create a grouping where the middle piece could be the most "busy," while the other two could feature smaller designs. The sky is the limit on the potential combinations one could do.

Here they are at home in my guest room...


Sunday, January 8, 2012

L-O-V-E

Anyone who has seen the LOVE sculpture in Philly, NYC, or elsewhere will appreciate this one, inspired by this brilliant blog post I found via Pinterest. In my version, the letters are anchored on a 20x20 white canvas. I'm using this to fill a large wall in my living room and it's perfect. If you want one but don't want to DIY, just visit my window shop.


Friday, January 6, 2012

Wedding monogram

It's been more than four years, but I'm still in love with the wedding monogram I designed for our wedding and subsequently incorporated everywhere I possibly could. The colors for our actual wedding were black and white so the monogram was our only "theme," and our reception in our hometown was fall themed so there I added some fall elements. In any case, here are all of the monogram items from that great day.


The invites I designed: tri-fold on linen black cardstock with Stardream (shimmery) cardstock elements. Separate insert cards for the ceremony, reception, and to RSVP:


Our wedding programs - Stardream black cardstock and Stardream ivory paper:


Our monogram on everything!


Candle lanterns, created by painting and glueing together four square picture frames from
Michael's, then printing our monogram on vellum:


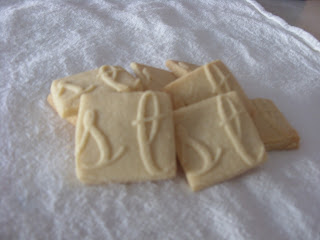
Monogram-stamped spritz cookies inspired by these from Martha Stewart Weddings. I created two sizes of these and ordered from Rubberstamps.net.


Made my own monogram stickers using full sheet sticker paper, available at office supply stores.


Finally, our placecards were personalized wine charms for each guest, to align with our dinner at a small Italian restaurant in St. Paul, MN. I printed on Stardream cardstock for these, and used tag-making supplies from Michael's Crafts to create the charms: